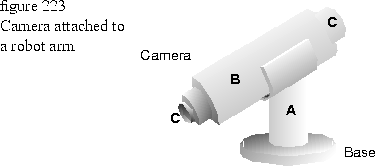
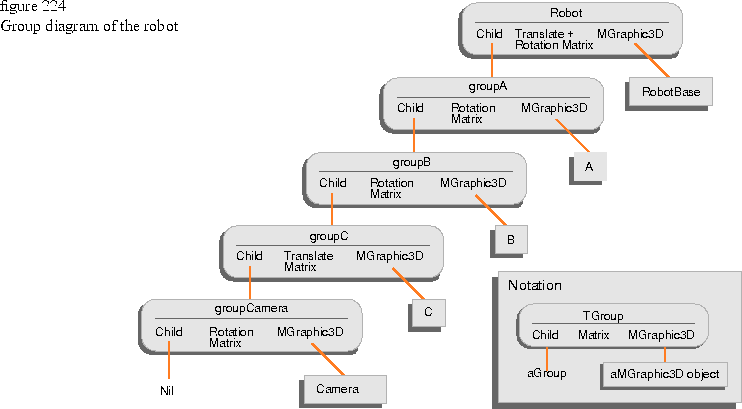
Figure 223 shows a 3D graphic that is a camera attached to a robot arm, and Figure 224 shows the group diagram for the camera and robot arm.


In certain situations, you might want to render the graphics as though you were looking through the camera that is attached to the robot. There might also be times when you would render the robot and camera from a position near the robot.
NOTE  If the camera is kept separate from the robot, synchronizing the camera movement with respect to the robot would be a difficult task.
A camera should be installed before rendering 3D graphics, and a camera should be able to render itself.
The following code example is one approach to installing a camera that can render itself. The code examples use a dummy TGrafPort (with a NIL device) and the builtin traversal capability offered by the group to install the transformed camera in a scene bundle. The TArticulatedLightCameraControl instance provides information about whether the scene bundle is used by a dummy TGrafPort, and provides ways to generate unique token values that can be used for setting light sources in the scene bundle.
Example
The following code fragment installs the camera in a scene bundle and renders the robot with the new camera setting. // Define the camera object with MGraphic3D
// This object is connected to the group hierarchy as shown above
class TRobotCamera : public MGraphic3D
{
// construct a camera and its geometry
TRobotCamera( const TCamera& aCamera,
const TCameraGeometry& geometry);
// Draw() performs two operations:
// 1. set the transformed camera to SceneBundle (residing
// in grafPort) if the grafPort is a dummy port.
// 2. otherwise, draw the geometry, if it is desired
Draw(TGrafPort& grafPort );
};
The implementation of articulated light sources is not as straightforward as that of the camera because a scene bundle can hold many light sources and setting a light source requires a token. With a simple modification to the TRobotCamera code, the following code fragment installs light sources to a scene bundle so that the light can be rendered. SceneBundle.SetAttribute(TArticulatedLightCameraControl( DUMMY ) );
dummyPort.BeginFrame( SceneBundle );
aRobot.Draw( dummyPort );
dummyPort.EndFrame();
SceneBundle.SetAttribute( TArticulatedLightCameraControl( REAL ) );
realPort.BeginFrame( SceneBundle );
aRobot.Draw( realPort );
The following code fragment installs the light to the scene bundle and renders the robot with the new light (this is almost identical to the code given above for the camera). class TArticulatedLight : public MGraphic3D
{
// construct a light and its geometry
TArticulatedLight ( const TLight& aLight,
const TLightGeometry& geometry);
// Draw() performs two operations:
// 1. Set the transformed light to SceneBundle (residing
// in grafPort) if the grafPort is a dummy port. The token is
// supplied by an ArticulatedLightCameraControl object.
// 2. Otherwise, draw the geometry, if it is desired
Draw(TGrafPort& grafPort );
};
      SceneBundle.SetAttribute(TArticulatedLightCameraControl(DUMMY))
      dummyPort.BeginFrame(SceneBundle)
      aGroupWithLights.Draw(dummyPort)
      dummyPort.EndFrame()
      SceneBundle.SetAttribute(TArticulatedLightCameraControl(REAL))
      realPort.BeginFrame(SceneBundle);
      aGroupWithLights.Draw(realPort);
[Contents]
[Previous]
[Next]
![]() Click the icon to mail questions or corrections about this material to Taligent personnel.
Click the icon to mail questions or corrections about this material to Taligent personnel.