Debugging CERN ROOT scripts and ROOT-based programs in Eclipse IDE
(30 October 2021)
NOTE: originally this post outlined a setup of a ROOT-based project in Eclipse IDE based on the Eclipse CDT4 CMake generator functionality. However, CMake4eclipse plugin provides a better integration of ROOT-based projects in Eclipse. Therefore post is updated in September 2022 to demonstrate the new approach. Former notes can be found here.
ROOT framework is written in C++, a language with complete manual control over the memory. Therefore, development and execution of your ROOT script (or Geant4 program) may sometimes lead to a crash providing minimal information in the stack trace. ROOT framework does not provide out-of-the-box solutions for debugging scripts. Hence, a question about debugging ROOT scripts now and then arises in the ROOT community.
Generally speaking, one does not need a special development environment to invoke a debugger on a ROOT script. Users can simply invoke the GNU Debugger (GDB) on the debug the root.exe binary:
gdb --args root.exe -l -b -q yourRootMacro.C
Similarly, GDB can be used for debugging stand-alone ROOT and Geant4-based programs. However, this debugging experience is carried out in the Terminal and lacks user interface and many useful features.
In this article, we outline an approach for robust debugging of CERN ROOT scripts and ROOT-based programs (also applies to Geant4-based programs). We will utilize Eclipse CDT (C/C++ Development Tooling) Integrated Desktop Environment (IDE), a free software coupled with the GNU debugger (GDB):
- Eclipse indexer scans the object-oriented hierarchy of the library classes, allowing easy navigation between C++ sources and headers, quick lookup of method overrides, code highlighting and many more.
- GDB allows pausing program execution at any time. Computer memory, object instances, variable values .
Additionally, the current approach allows users to have ROOT and Geant4 frameworks built in both - Release and Debug modes installed on the same computer. Debug binaries are great for development, allowing memory analysis and efficient development. Release builds - on the other hand - can be optimized for robust execution of the program and may work up to 10 times faster.
A few words about the operating system (OS). In this post, we will consider the setup on Linux-based systems. A similar approach may be replicated to macOS with GNU toolchain, but will require a code signing procedure. Windows is a totally different story.
Following milestones are required to complete the setup of the development environment:
- Install Eclipse IDE on your computer. Eclipse is an all-in-one development solution that automates many things: source highlighting and formatting, invokes the CMake build, lets users set breakpoints in code, attaches the debugger to the executable, and many more.
- Obtain ROOT source code on your computer. Once attached to the project, this allows easy inspection and navigation between your script (or program) and ROOT source files within the IDE user interface. It also allows modification of the frameworks’ source files while debugging your program, which makes it easy to fix bugs and issue Pull Requests to the ROOT open-source code.
- Compile ROOT with debug symbols. This provides the ability to set up breakpoints in your code and original ROOT (and/or Geant4) source files, inspect variables, access data types and object members in the program source code.
- Transform ROOT script into a standalone program. ROOT scripts designed to run with C++ interpreter (executed line-by-line), need to be transformed into a compiled C++ program - with an entry point in “main()” function.
- Set up your ROOT-based program in Eclipse IDE. During the main project setup, ROOT project is marked as a reference. This automatically triggers the rebuild and re-install of corresponding ROOT components prior to the main project build. Additionally, ROOT project indexer database becomes shared with your project.
Eclipse IDE Setup
In this section we demonstrate how to install Eclipse IDE on a personal Linux computer. We will use Eclipse with the cmake4eclipse plugin - a powerful tool for use with CMake-based projects. Cmake4eclipse automates the project setup and allows for automatic rebuild of the frameworks’ libraries (ROOT and/or Geant4) once their source code was changed.
Today (Aug 2022) CMake4eclipse plugin provides better integration of CMake-based projects in Eclipse compared to other options as:
- Using CMake generator to create Eclipse project.
- Using the built-in Eclipse wizard to import an existing CMake project.
Each of the above options have its own drawbacks that are a subject of a separate discussion. Following steps are required to set up the IDE workflow.
-
Install Eclipse IDE. Download the Eclipse installer from the official website, extract it and run. Select “Eclipse IDE for C/C++ Developers”. Refer to the screenshot and instructions below:
A. Recent Eclipse versions come with bundled Java Runtime Environment (JRE). As of July 2022, specify the built-in JRE version 11. Otherwise there will be an error accessing Eclipse help. This may be fixed in later Eclipse releases.
B. On Linux it is a good practice to install software that is not included in your distribution under the
/opt,/usr/local/folder or home folder. In this article we will stick to the latter option and install Eclipse in the home folder under~/Applications/for consistency with the setup on macOS.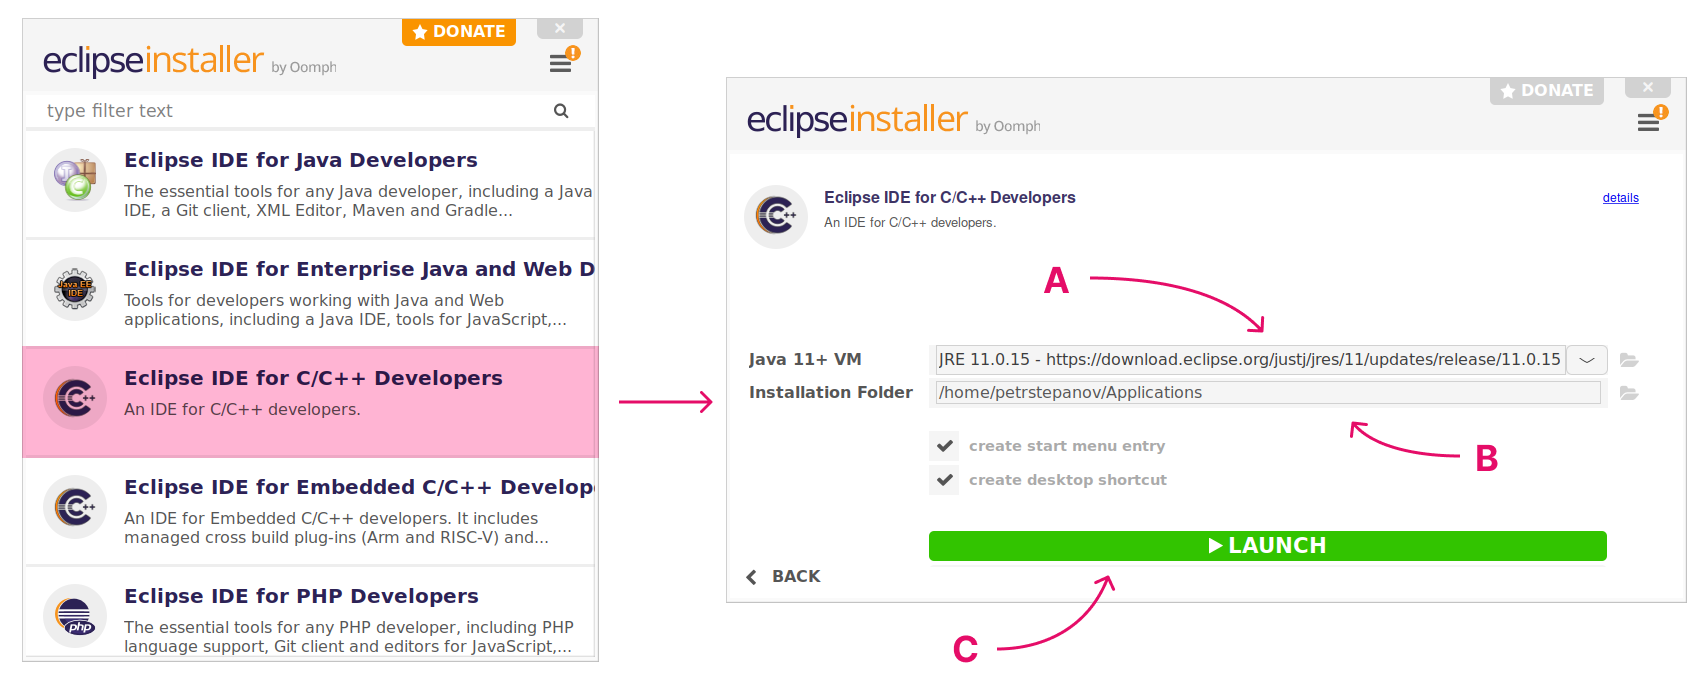
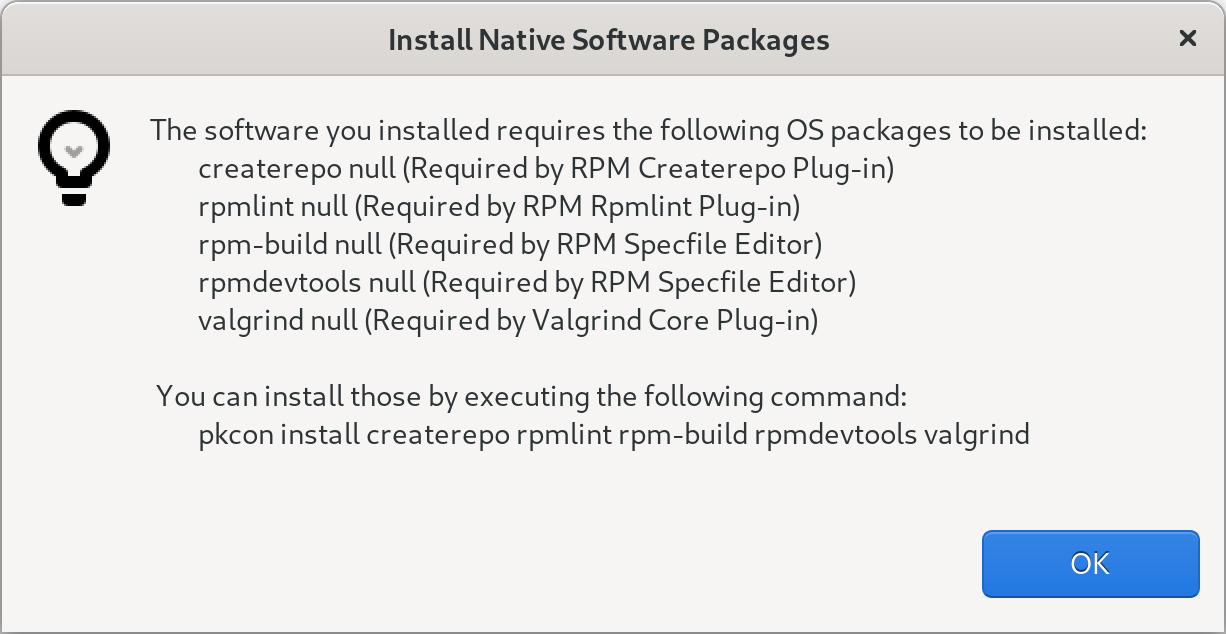
C. Wizard will provide a required list of packages to be installed on your system. Ensure all of the package dependencies are installed on your system.
D. Exit the wizard. There is no need to launch Eclipse right away. We will tweak its configuration file first.
-
Increase Eclipse memory limits. ROOT libraries contain thousands of source files. Usually, when indexing a ROOT-based project, memory use fluctuates around 2GB. Eclipse memory use be inspected with the VisualVM application.
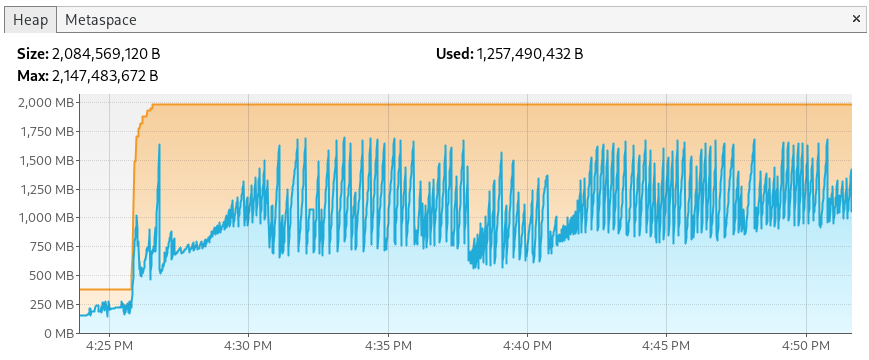
Memory limits are specified in the
eclipse.inifile located inside the Eclipse install folder. Use text editor to update following lines:-Xms512m -Xmx4096m (set to 2048m minimum or higher if available)Here the
-Xmsvalue corresponds to the initial heap size used at the Eclipse startup. The latter-Xmxvalue is to the maximum available memory limit. The more libraries are used in your project (ROOT, Geant4) the higher-Xmxvalue is required for Eclipse indexer. Indexing speed of the framework source files will be higher with more available RAM. -
Fix Eclipse launcher. If Eclipse window does not properly minimize to the dock icon, execute following command (bug report submitted here):
echo StartupWMClass=Eclipse >> ~/.local/share/applications/epp.package.cpp.desktop -
Tweak memory limit for Eclipse indexer. Launch Eclipse and select default workspace location (e.g.
~Development/eclipse-workspace). In the Eclipse menu open Window → Preferences → C/C++ → Indexer. Under “Cache Limits” set:Limit relative to maximum heap size: 75%
Absolute limit: 4096 MB (same as for -Xmx value in eclipse.ini) -
Update Eclipse and its CDT plugin. In the menu select Help → Check for updates. Follow the wizard steps. Restart Eclipse if required.
-
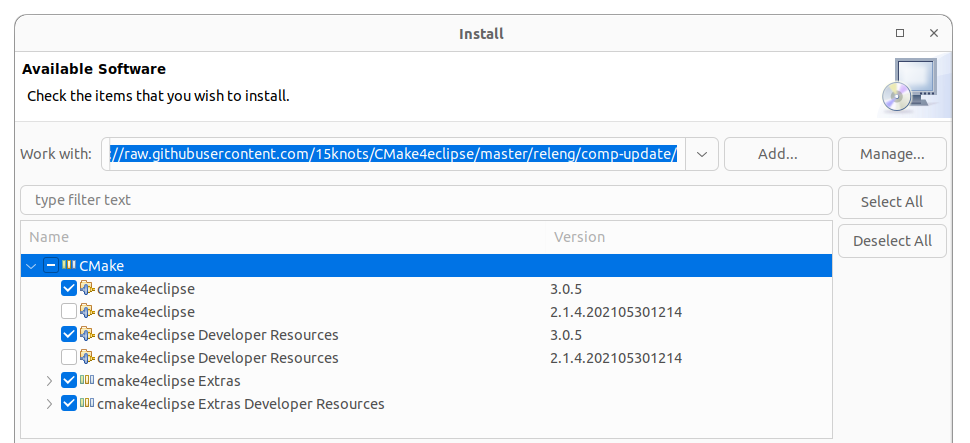
Install CMake4eclipse plugin. Project details can be found on GitHub. In the Eclipse menu select Help → Install new software. Enter following URL in the “Work with” field:
https://raw.githubusercontent.com/15knots/CMake4eclipse/master/releng/comp-update/In the modal dialog select everything but uncheck the older version of CMake4eclipse (v2). Keep only version v3. Follow the wizard steps and restart Eclipse. Refer to the screenshot below:
-
Tweak cmake4eclipse settings. Set default workbench for CMake4eclipse. In the Eclipse menu select Window → Preferences → C/C++ → Cmake4eclipse → Default build system → Set “Unix Makefiles”.
On the “CMake cache entries” tab, specify the C++ standard used for the build. Add corresponding CMake cache entry:
Name Type Value CMAKE_CXX_STANDARD STRING 17 It is important for the ROOT-based programs to be compiled with the same C++ standard as the ROOT libraries. Therefore, in this guide we will explicitly set the C++ standard for ROOT, Geant4 and their based programs, more info here. We will use the C++17 standard.
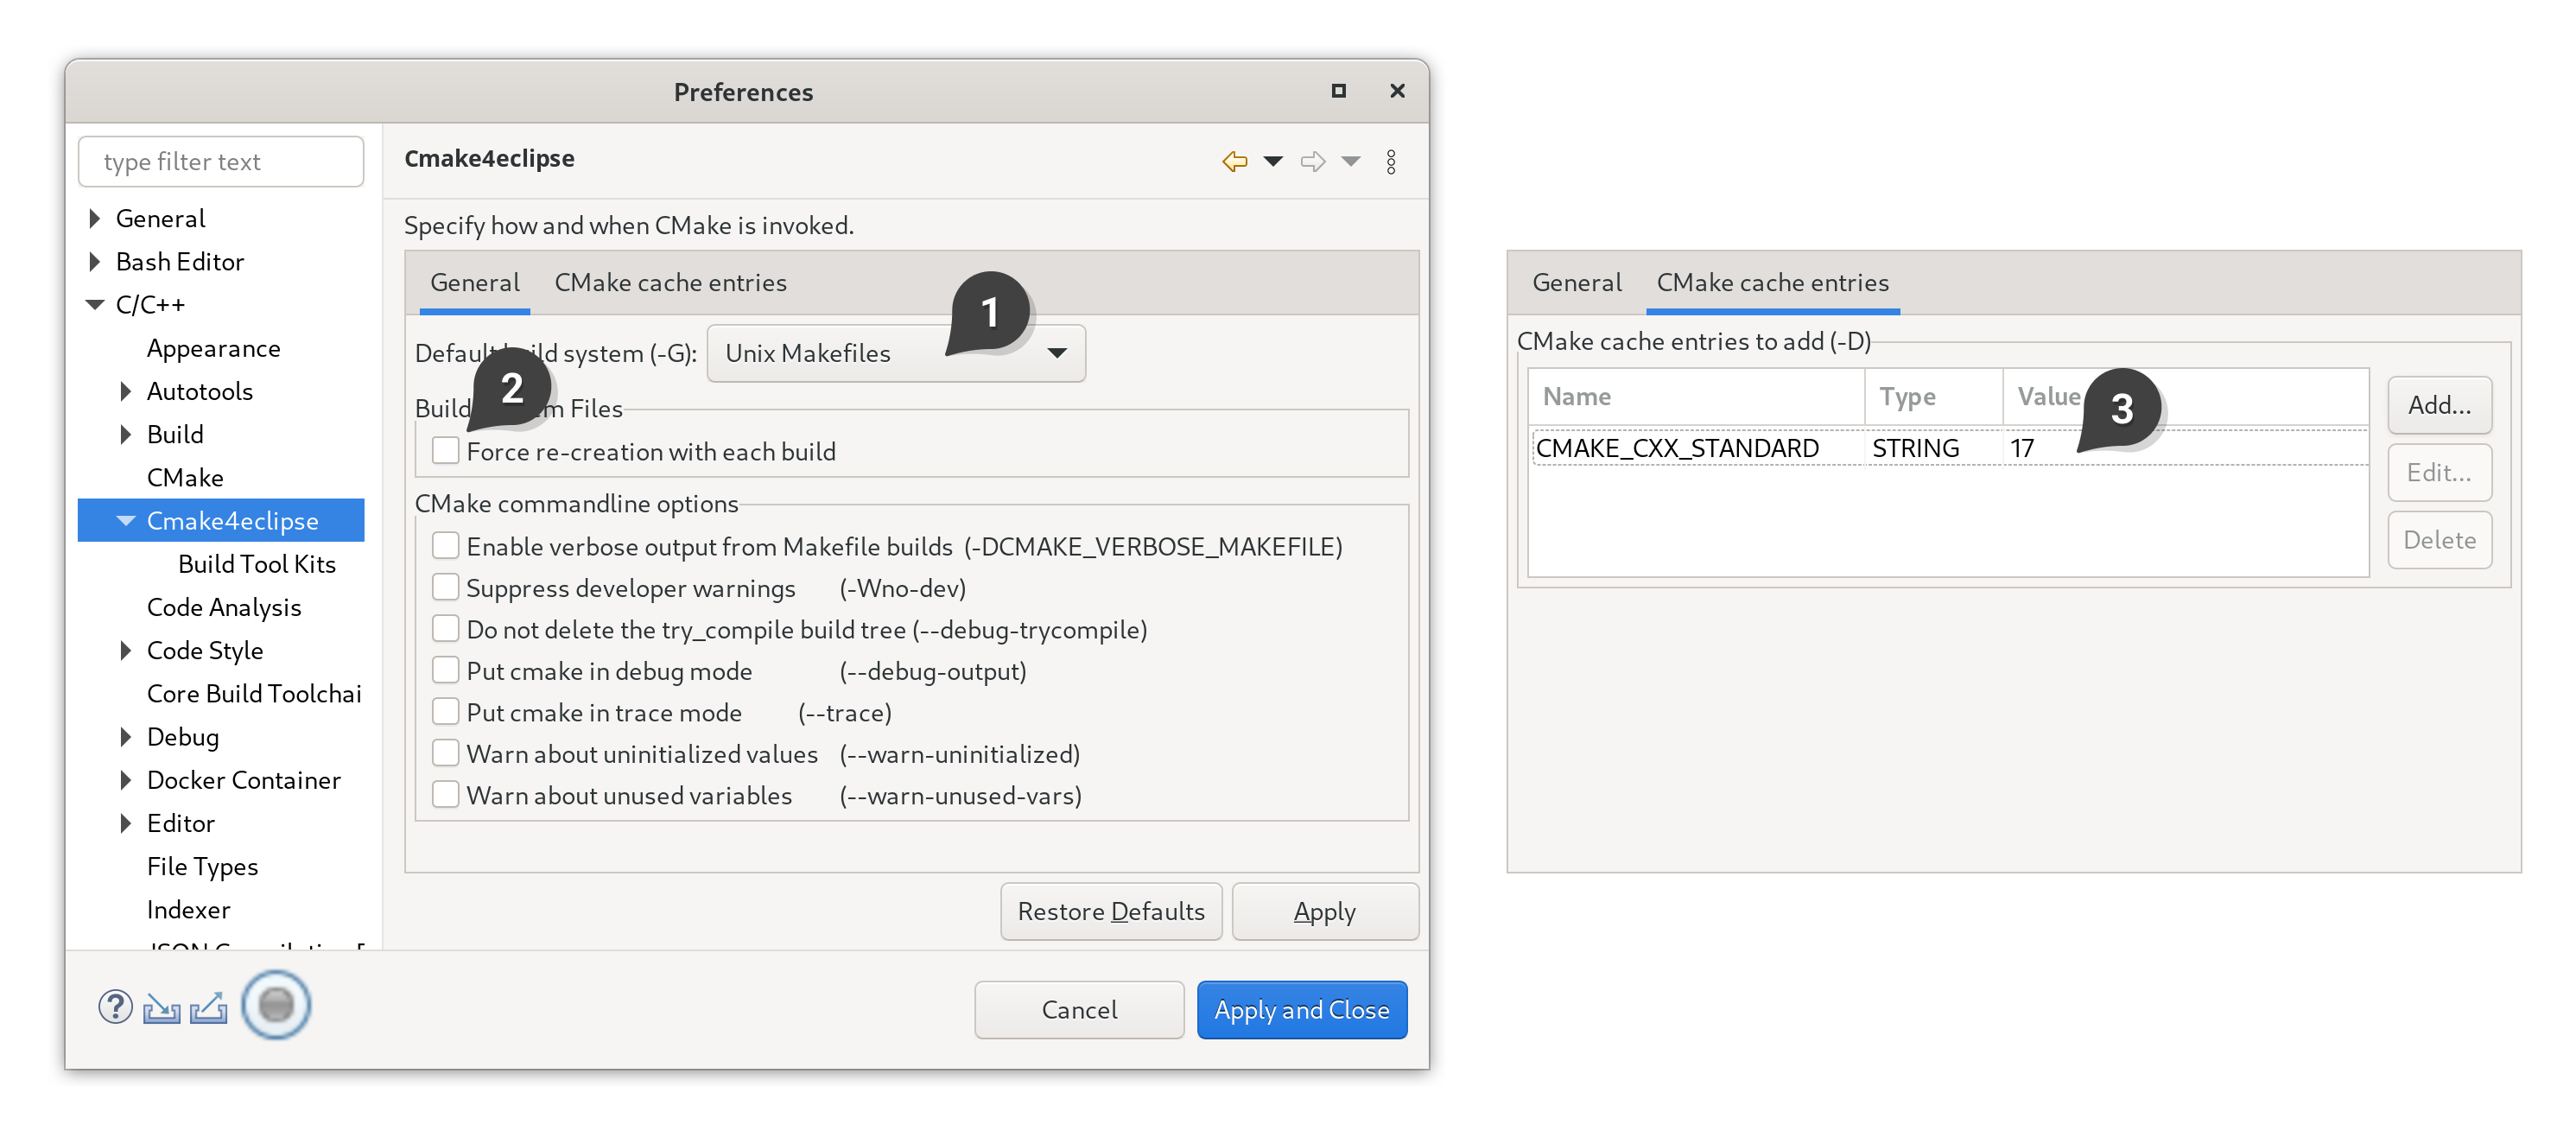
Tip: if having problems with the build later, check “Force re-creation with each build”. This will trigger the CMakeLists.txt update and re-generation of the Unix makefile at every build, reflecting possible changes in the CMake cache entries (variables) and ROOT components’ source code.
Optionally apply following useful tweaks to the Eclipse workflow:
- Hide the Launch Bar. It indeed takes quite some space on smaller screens. In the Eclipse menu go to: Window → Preferences → Run/Debug → Launching → Launch Bar. Uncheck “Enable the Launch Bar”.
- Display line numbers. In the Eclipse menu go to: Window → Preferences → General → Editors → Text Editors. Check “Show line numbers”.
- Kill the previous application run upon starting a new one. In the Eclipse menu, select Window → Preferences → Run/Debug → Launching → “Terminate and relaunch while launching”.
- Save before building. It’s useful to automatically save source files upon triggering the build. In the Eclipse menu, select Window → Preferences → General → Workspace → Build and select “Save automatically before manual build”.
- Tweak scalability settings. In Window → Preferences → C/C++ → Editor → Scalability set “Enable scalability mode… is more than” 50000 lines.
We successfully installed and set up the Eclipse with CMake4eclipse plugin and are now ready to set up ROOT project in Eclipse IDE.
Building ROOT with Debug Symbols
In this section we address the setup of ROOT libraries as a project in Eclipse IDE. Framework will be built with debug symbols. This allows for setting breakpoints in the ROOT code, inspecting memory and variable values during the program run.
-
Install dependencies. Refer to this page on ROOT website to satisfy the dependencies for your particular Linux distribution.
-
Obtain the source code. There are a few options here.
A straightforward way is to download ROOT sources for a specific release from the ROOT website. Extract ROOT sources under the
~/Developmenthome folder. We will keep all the source code and Git repositories in this folder for consistency purposes.Alternatively, if a user plans on contributing towards the ROOT repository it is recommended to fork the latest
masterbranch on GitHub, create a new branch in your forked repository and check it out:mkdir -p ~/Development && cd ~/Development git clone https://github.com/<your-username>/root git checkout -b <your-feature-branch>This allows for issuing Pull Requests to the original repository. More details can be found on this page.
-
Set up a project in Eclipse. Launch Eclipse. In the menu open File → New → Project… Expand “C/C++” and select “C++ Project” (not “C/C++ Project”).
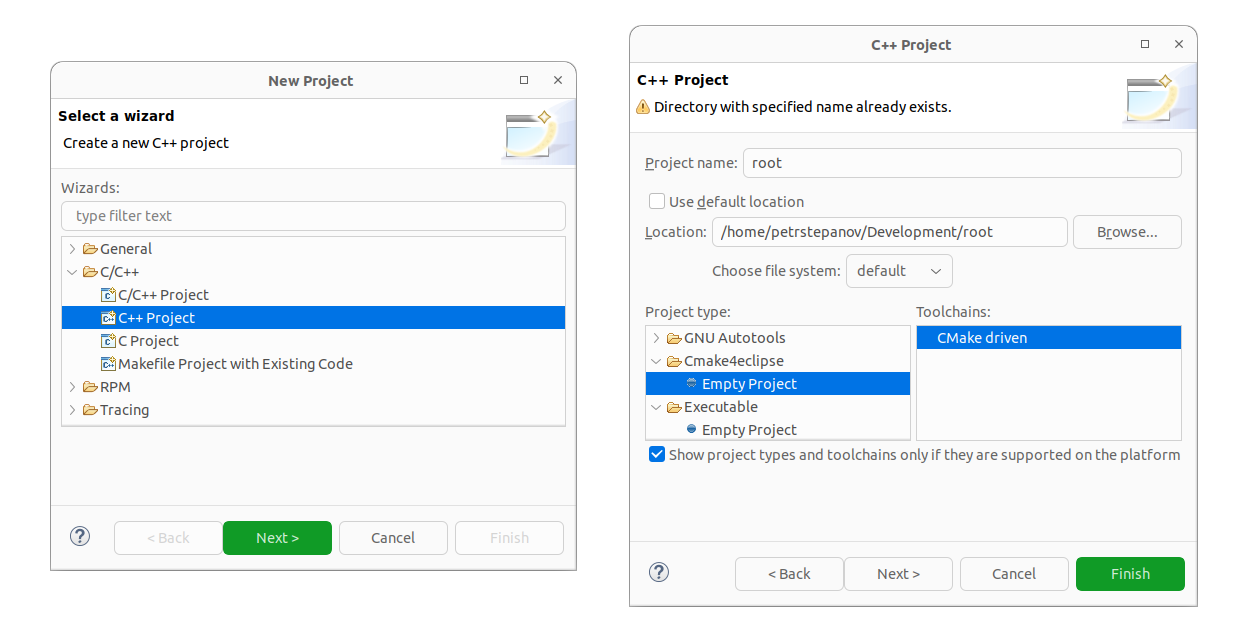
On the next dialog, specify “root” as the project name. Uncheck “Use default location” and “Browse…” for ROOT sources location (e.g.
~/Development/root). In “Project Type” expand “Cmake4eclipse” and select “Empty Project”. In “Toolchains” select “CMake driven”. Click “Next >”.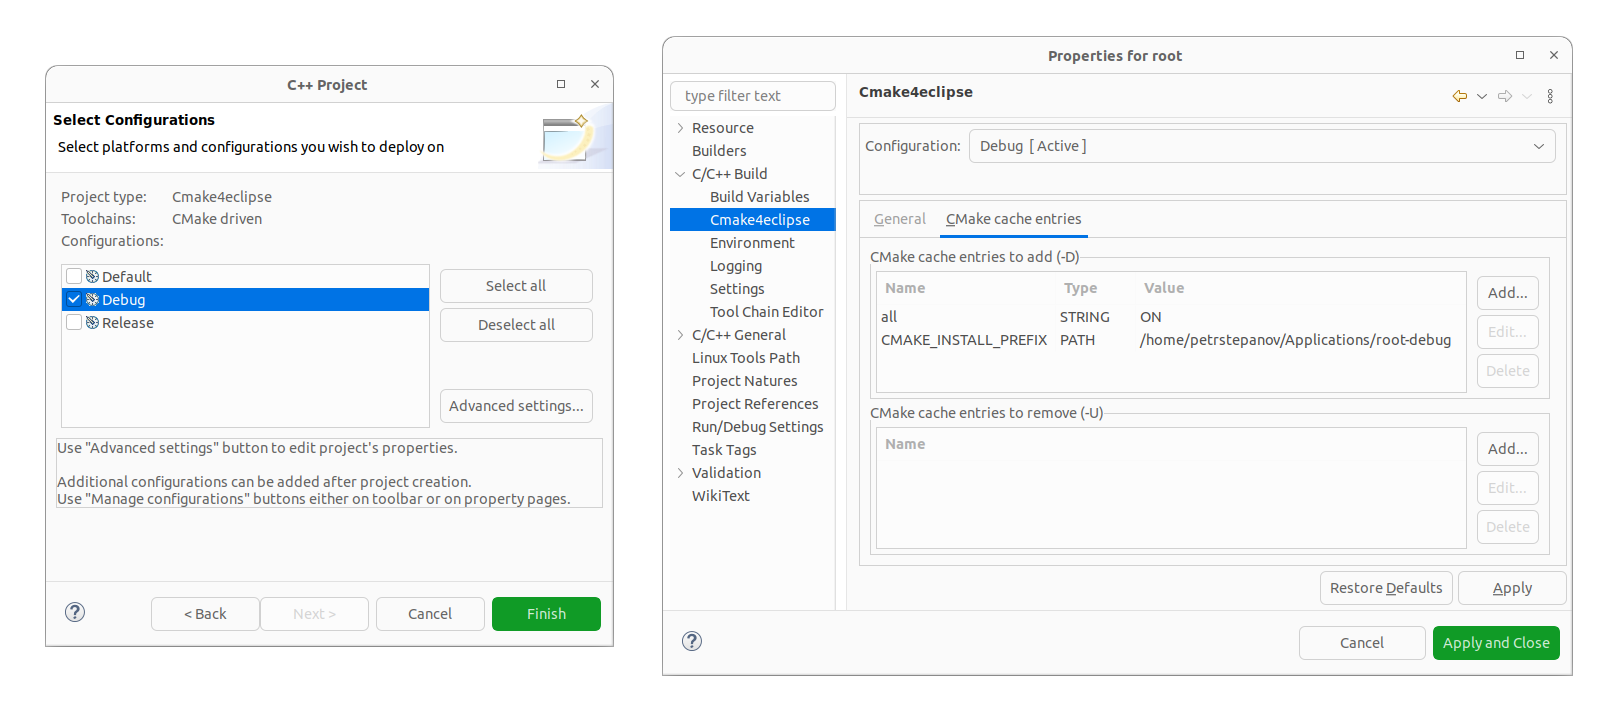
We are building ROOT with debug symbols. Therefore, uncheck “Default” and “Release” build options and only keep the “Debug”. Essentially this dialog box specifies the CMake
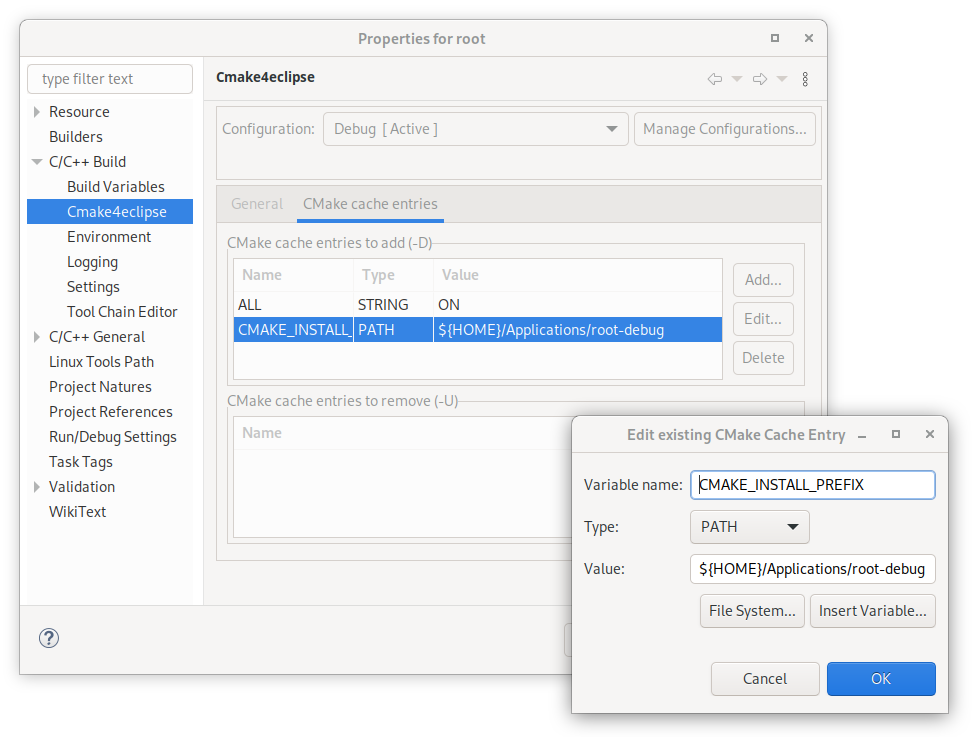
-DCMAKE_BUILT_TYPEvariable.Next we provide the CMake plugin with ROOT build options. Click “Advanced Settings…”. Go to C/C++ Build → Cmake4eclipse. Open the “CMake cache entries” tab. Add following variable names and values. Use “Add…” button on the right and input following variable names, types and values:
Name Type Value CMAKE_INSTALL_PREFIX PATH ${HOME}/Applications/root-debug all BOOL ON When specifying variables of a PATH type, it is handy to use the “File System…” button. It will display the folder picker dialog and minimize the chance of specifying a wrong path. Refer to the screenshot below:
In this tutorial we build ROOT with all optional components turned on (
-Dall=ON). Find a complete list of the ROOT CMake build variables on the ROOT website and tailor the build for your needs.Click “Apply and Close”. Click “Finish”.
Notice that Eclipse will start indexing the project. However, we will reschedule this operation later - after the build is completed. Reveal the “Progress” panel (tiny scrollbar animation in the very bottom right corner). Stop the indexer operation.

-
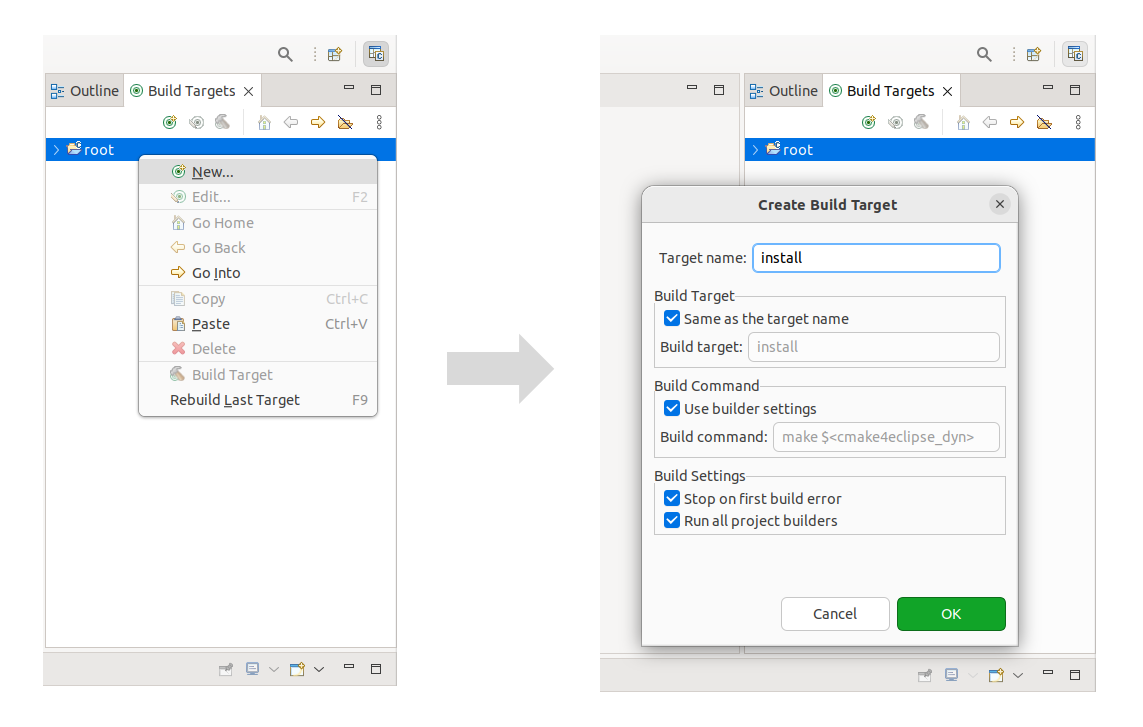
Build framework in Eclipse. Reveal the “Build Targets” tab (on the right side) and select “root” project. Right-click and select “New…” build target. Name target “install”. Click “Ok”. Expand “root” in the “Build Targets” tab and double-click the “install” target.
Build process speed depends on your computer speed and provided build variables. It may take up to a few hours to finish.
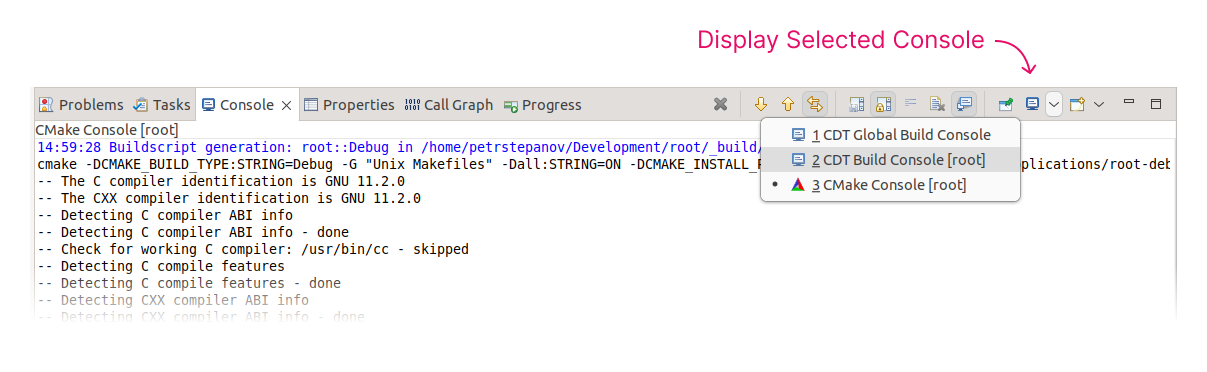
Tip: to switch between the CMake console and Linux make console, locate the “Display Selected Console” dropdown on the bottom actions panel.
-
Exclude build folder from indexing. Cmake4eclipse plugin performs a so-called in-source build. Meaning that the build folder is located within a project file tree. During the build ROOT header files are copied and duplicated inside the “_build” folder. To avoid indexing duplicate sources and headers, right click “root” project → Properties → C/C++ General → Paths and Symbols → Source Location. Expand the “/root” folder. Select “Filter”. Click “Edit filter…”. Add the “_build” folder to the filter. Click “Apply and Close”.
-
Run Eclipse indexer. We are now ready to index all ROOT source files and headers. This will create an Object-Oriented Programming (OOP) database of all ROOT object types, their methods and inheritance relations. Right click “root” project → Index → Rebuild.
Tip 1: sometimes Eclipse indexer may freeze while parsing the
./interpreter/llvm/src/tools/clang/lib/Driver/sub-folder. If this happens, exclude theinterpreterfolder from the build (this also excludes folders from the index). Highlight theinterpreterfolder in the project tree. Right click, and select Resource Configurations → Exclude from build. Check “Debug” configuration. Click “Ok”. Now right click “root” project → Index → Rebuild.Tip 2: Indexer usually takes couple hours to parse all of the ROOT framework source files. Computers with fast NVMe hard drives will perform this task the best. For computers with SATA drives and older I recommend keeping ROOT sources on the RAMDisk. Feel free to find my RAMDisk implementation on GitHub.
-
Turn off false positive errors. Even though the ROOT compilation succeeds, Eclipse code analysis tool displays semantic errors in ROOT sources. To turn them off, right-click “root” project and open Preferences → C/C++ General → Code Analysis. Select “Use Project Settings” option. Uncheck “Syntax and Semantic Errors” group. Maybe someone has a better idea how to fix that?
Eclipse carries out the in-source build, meaning that the “_build” folder is located inside the ROOT project tree. Apparently, if users want to issue pull requests to the ROOT GitHub repository, the “_build” folder needs to be added to the “.gitignore” of the local ROOT Git branch.
At this point ROOT libraries are compiled with debug symbols and Eclipse has indexed all the framework source files.
Not to mention, Geant4 framework libraries can be built in Eclipse exactly the same way as outlined above for the ROOT project.
Transform ROOT script into CMake ROOT-based Program
ROOT scripts are originally designed to run through the Cling, a modern C++ interpreter based on the LLVM and Clang. To debug a ROOT script with native Linux GNU development tools - gcc compiler and gdb debugger - we need to convert a ROOT script into a ROOT-based program. Having it compiled into an executable with debug symbols, we will be able to invoke a debugger on it.
Skip to the next section if you already have a ROOT-based program code ready.
Next we elaborate how to convert a ROOT script into a CMake ROOT-based program. Generally speaking, this involves following:
- Compose CMakeLists.txt file containing a set of instructions that:
- Locate necessary libraries (ROOT, Geant4).
- Find and compile source and header files in your project.
- Create a ROOT dictionary and shared library for your program.
- Link all object files and shared libraries into an executable.
-
Explicitly define all the headers used in your script (Cling interpreter does not require that).
- If using the Object-Oriented-Programming (OOP) approach, certain class names need to be listed as directives in a special “LinkDef.h” file for the dictionary and shared library generation.
Detailed instructions elaborating each item above can be found in this template repository on GitHub. Please refer to the repository README file.
Setting up a ROOT-Based CMake Program
In this section we will set up a ROOT-based CMake project in Eclipse IDE.
-
Obtain the source code. Place your ROOT-based project into a desired location, e.g.
~/Development. -
Set up the CMake4Eclipse project. Similarly to the ROOT project setup, in the Eclipse menu open File → New → Project… Expand “C/C++” and select “C++ Project” (not “C/C++ Project”).
On the next dialog, specify your project name. Uncheck “Use default location” and “Browse…” for your project “CMakeLists.txt” location. In “Project Type” expand “Cmake4eclipse” and select “Empty Project”. In “Toolchains” select “CMake driven”. Click “Next >”.
For the development purpose we uncheck “Default” and “Release” build configurations and keep the “Debug” option only.
Next we need to provide the CMake plugin with corresponding build variables. Click “Advanced Settings…”. Go to C/C++ Build → Cmake4eclipse. Open the “CMake cache entries” tab.
Since we compiled and installed ROOT and Geant4 not system-wide, but in
~/Applicationshome directory, we need to provide the CMake with the locations of “RootConfig.cmake” file. Use “Add…” button on the right to input following variable name, type and value:Name Type Value ROOT_DIR PATH ${HOME}/Applications/root-debug/cmake Make sure that the path specified above is accurate.
Alternatively, paths to ROOT (and Geant4) CMake configuration files can be provided together in one variable CMAKE_PREFIX_PATH. Multiple paths are separated by the semicolon:
Name Type Value CMAKE_PREFIX_PATH PATH ${HOME}/Applications/root-debug/cmake -
Set environment variables. Now we need to set the environment variables for the ROOT-based project. It is important to set the variables only for your particular ROOT-based project in Eclipse (not in general Eclipse settings). If set for all Eclipse projects, environment variables may interfere with the subsequent rebuilds of the ROOT (or Grant4) framework.
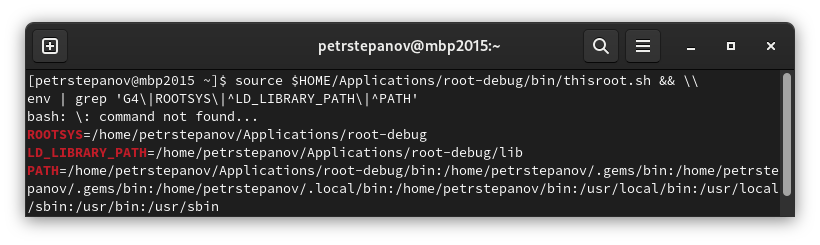
Source ROOT and/or Geant4 variables in Terminal and manually plug them into the Eclipse settings. Open Terminal and execute following command (copy paste as one line):
source $HOME/Applications/root-debug/bin/thisroot.sh && \\
env | grep 'G4\|ROOTSYS\|^LD_LIBRARY_PATH\|^PATH'
Required environment variables are output in the Terminal window:
Now go back to the project setup dialog in Eclipse, open C/C++ Build → Environment. Manually “Add…” each environment variable name and value into the Eclipse project settings:
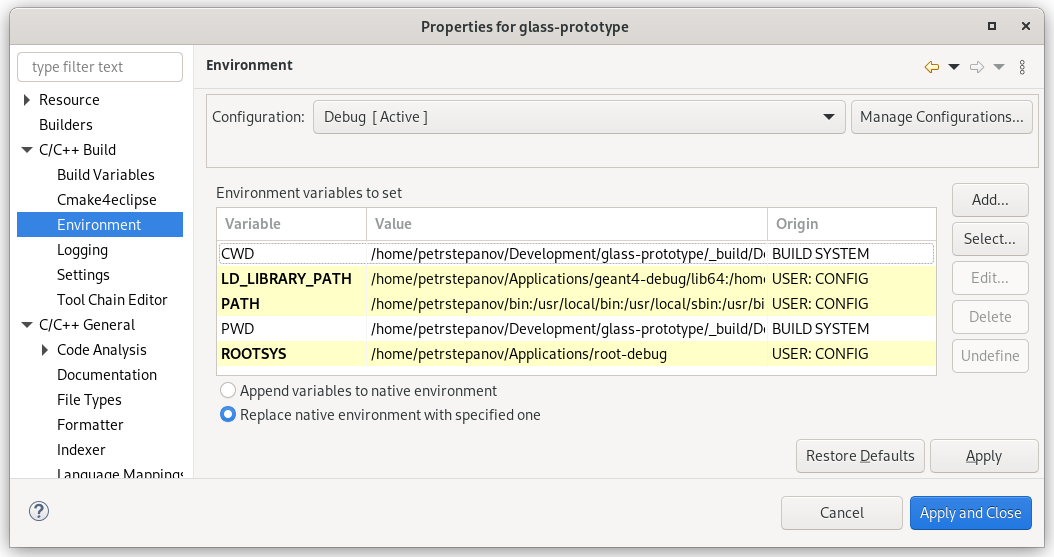
Also, select “Replace native environment with specified one” option. This will isolate Eclipse project environment variables containing paths to frameworks built with debug symbols from potentially installed ROOT or Geant4 release versions on the system. Click “Finish” button.
-
Build project in Eclipse. Highlight your project in the Project Explorer. Right click → build.
- Reference ROOT project. Select your ROOT-based project in the Project Explorer. Right click properties → Project References → Check “root”. This allows following:
- Sharing ROOT and/or Geant4 indexer database with your project.
- Rebuild of ROOT libraries prior to your project build in case any of ROOT source files were changed.
-
Create a run (debug) configuration. Select your project in the project tree. In the Eclipse menu, open Run → Debug Configurations…
Select “C/C++ Application”. Press the “New launch configuration” button (on the very top left). Click the “Search Project…” button and locate the corresponding executable file.
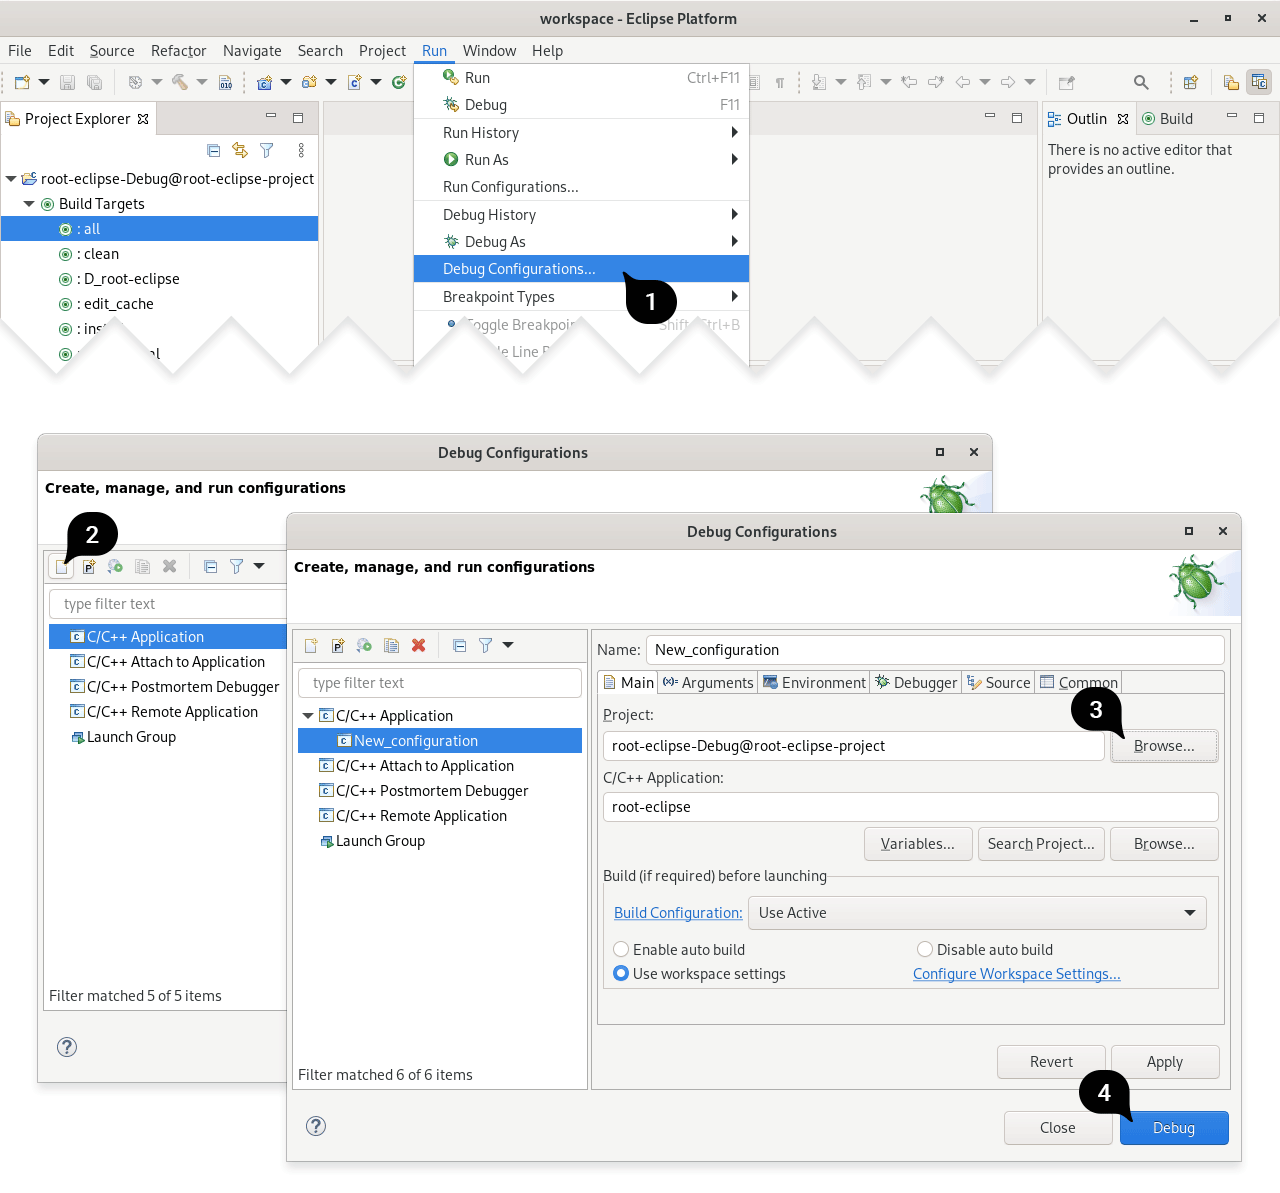
If necessary, specify any command-line parameters on the “Arguments” tab. Click “Debug”.
This is it. Now you can enjoy full-scale debugging of your ROOT-based applications in Eclipse IDE.
Summary
In this post, we learned how to pair Eclipse IDE and cmake4eclipse plugins to setup an effective development environment for CERN ROOT scripts and ROOT-based programs. It was a process, so let’s draw a line and summarise what we learned today:
- Learned how to install and setup the Eclipse IDE and cmake4eclipse.
- Compiled ROOT project with debug symbols in Eclipse.
- Investigated how to transform a ROOT script into a ROOT-based program with CMake configuration file.
- Got familiar with Eclipse IDE user interface. Set up our ROOT-based project, created and run the Debug configurations.
I hope you enjoyed this technical note. If not yet familiar, you can now continue learning fundamental Eclipse CDT hotkeys and debugging capabilities on YouTube.
For those who are interested in setting up the same development environment for a project that utilizes both - Geant4 and ROOT, please follow this link.
Feel free to leave comments below if you have any questions or recommendations.